For this project, we had to take pancakes and then add in an angry mouth. First we put a picture into photoshop and used a took to make a hole between the two pancakes. We then took the mouth and inserted it into the pancakes. Lastly we made the mouth fit into the pancakes and not look weird!
Tuesday, March 26, 2013
Midterm...Half Way There!
This was my most successful project so far because I was really able to make it into multiple colors. This was because I choose a picture with lots of texture to go back and cut out. I also enjoyed doing this project because I liked mixing the colors and finding out what looked good together. It was a fun way to learn how to do another type of multiple layered project!
So far this was my favorite project because I feel that it actually looks like me. It also taught me how to make a picture shaded where as I did not know how to do that before. I enjoyed working on this project the most to because it was time consuming but I could not wait to see the final product. This project showed me that art can take longer than just a few minutes. I worked on this for about three days during class.
So far this was my favorite project because I feel that it actually looks like me. It also taught me how to make a picture shaded where as I did not know how to do that before. I enjoyed working on this project the most to because it was time consuming but I could not wait to see the final product. This project showed me that art can take longer than just a few minutes. I worked on this for about three days during class.
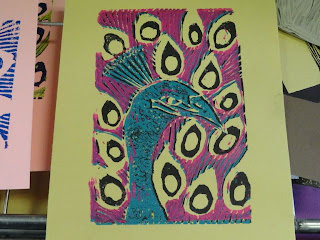
Peacock Print
During this project we had to first pick an animal that we liked. The animal needed to have lots of texture on it so that the print would turn out with different spots. Next we had to draw the animal on a piece of paper and then transfer it onto the piece of rubber which would be used as our stamps. To carve out the picture on the rubber we used a special kind of knife kind of like a shovel. Lastly, we took the ink, rolled it onto the stamp, and press it onto the paper. As I did above, you can then cut more out of the stamp and roll a different color and stamp it onto the same picture. With this you can get more than one color onto your print and it will be colorful!
Tuesday, March 12, 2013
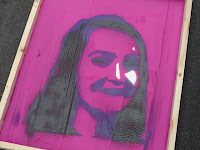
Spray Paint Self Portrait
During this unit, we had to create a layered self portrait using spray paint. The first thing to do was to project our picture we made on the computer onto a white piece of paper. We then cut out each color and layed them onto our frame. One by one we spray painted the the stencil a different color as you can see above. Lastly, we had to paint the frame and I decided to put a boarder around the portrait to take up some of the blank space. Overall, I think this was a really fun project because the outcome actually looked like me and I was happy with the results.
Pencil Self Portrait
This is a self portrait that I had to draw of myself. Mine is not sone yet so I still have to make some alterations. To start with we had to measure out how wide and how long our face was. Then as you can see, I had to measure where all the features of my face would be. For example, the eyes are right in the middle of your face and the end of the nose is half way between the eyes and the end of the chin. The next part was to shade the darker and the lighter parts of the face and show where highlights would be in the hair. If I ever did this project again, I would try to make my portrait look more like me. Personally, I don't think that this looks much like me, but it was my first time drawing a self portrait.
Subscribe to:
Posts (Atom)


